Drone Photo Editing is Not as Hard as You Think. Here’s How to Start
So you’ve captured some stunning aerial shots with your drone. The lighting looked perfect, the scenery was breathtaking, and everything seemed just right. But when you check your photos later, they don’t have that wow factor. Maybe the colors look flat, the exposure is off, or the details just aren’t popping the way you expected. That’s where drone photo editing comes in. Even the best drone photographers rely on editing to fine-tune their images. A few simple adjustments can turn a dull shot into something eye-catching.
In this guide, we’ll go over the basics, from fixing exposure to advanced tricks like HDR imaging. Whether you’re just starting or looking to refine your skills, this breakdown will help you get the most out of your drone shots.
1. Shooting for Success: Setting Yourself Up for Easy Editing
Editing can fix a lot, but starting with a high-quality image makes things easier. If you set up your shots the right way, you’ll spend less time fixing problems later.
Shoot in RAW Format
- RAW captures more details and gives you more control over exposure, colors, and sharpness.
- JPEG files are compressed and lose a lot of data, making it harder to fix shadows and highlights.
- Most drones let you choose RAW in the camera settings—always enable it if you plan to edit your photos.
Use Auto Exposure Bracketing (AEB) for HDR Editing
- AEB takes multiple shots at different exposure levels.
- These images can be merged later to create a high-dynamic-range (HDR) photo.
- HDR helps balance bright skies and dark landscapes, making details stand out.
Keep ISO Low for Cleaner Images
- A higher ISO makes your photo brighter but also adds noise (grainy texture).
- Keep ISO at 100 whenever possible for the cleanest image.
- If lighting conditions force you to increase ISO, use noise reduction in editing software later.
By following these steps, you’ll have solid images right out of the camera, making editing smoother and more effective.
2. Essential Drone Photo Editing Adjustments
Now that you’ve got some solid shots, let’s talk about basic editing steps that every drone photographer should know. These adjustments will instantly improve most images.
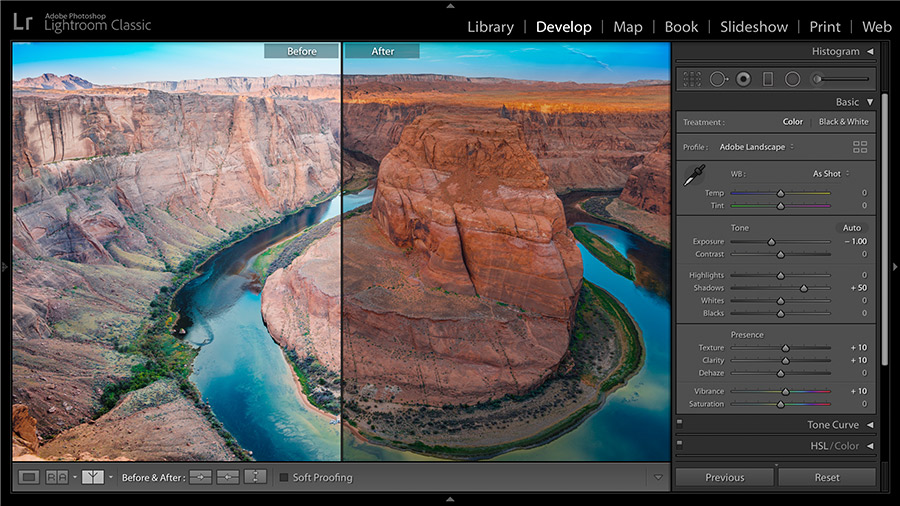
Adjust Exposure and Contrast
- If your photo is too dark or too bright, tweak the exposure slider.
- Increase contrast to make shadows deeper and highlights brighter.
- Avoid overdoing it—too much contrast can make details disappear.
Set the Right White Balance
- White balance controls the color temperature of your image.
- A cloudy sky can make photos look too blue, while a sunset might add too much warmth.
- Adjust the temperature and tint sliders until the colors look natural.
Enhance Vibrance and Saturation
- Vibrance boosts muted colors while keeping skin tones and highlights natural.
- Saturation increases the intensity of all colors evenly.
- Use vibrance instead of saturation for a more balanced look.
Fine-Tune Highlights, Shadows, and Clarity
- Lower highlights to recover blown-out skies.
- Raise shadows to bring out details in darker areas.
- Add clarity to make textures pop, but don’t overdo it—too much can make an image look artificial.
These small adjustments go a long way in making drone photos look polished while keeping them natural.
3. Advanced Editing Techniques for Next-Level Drone Photography
Once you’ve nailed the basics, it’s time to step up your editing game. These advanced techniques can make a huge difference in how your drone photos look. They take a bit more effort, but the results are worth it.
HDR Imaging for Maximum Dynamic Range
High Dynamic Range (HDR) editing is a game-changer, especially for drone shots that have both bright skies and darker landscapes.
- If you shot using Auto Exposure Bracketing (AEB), merge your images in Lightroom or Photoshop.
- Adjust the tone mapping to keep the sky from looking too washed out and the shadows from being too dark.
- Avoid making the image look too unrealistic—some HDR edits can look over-processed.
HDR is great for sunrise, sunset, and high-contrast scenes where a single exposure just doesn’t cut it.
Targeted Color Refinement
Sometimes, overall color adjustments aren’t enough. That’s where targeted color editing comes in.
- Use the HSL (Hue, Saturation, Luminance) panel in Lightroom or Photoshop to fine-tune specific colors.
- If the sky looks too dull, increase the saturation and luminance of the blues.
- Adjust the greens and yellows in landscapes to create richer, more vibrant tones.
Small changes to individual colors can make your drone shots look more natural and balanced.
Selective Masking for Precise Adjustments
Masking lets you apply edits to only certain parts of an image without affecting the entire photo.
- Use linear and radial gradients to edit skies or brighten up focal points.
- Try AI-powered selection tools in Lightroom to quickly adjust subjects like buildings or mountains.
- Darken distracting areas to draw attention to the subject.
This is a great way to make certain areas of your photo pop without over-processing the entire image.
Image Stacking for Noise Reduction
Even with a low ISO, some drone shots might have noise, especially in low-light conditions. Image stacking can help.
- Take multiple photos of the same scene.
- Load them into Photoshop as layers, align them, and use median blending to reduce noise.
- This method works best for still shots where nothing in the scene is moving.
If you’re serious about clean, detailed images, stacking is a great trick to have in your editing toolkit.
4. Best Post-Processing Software for Drone Photo Editing

Choosing the right editing software makes a huge difference in how easy (or frustrating) the process can be. Some programs are better for quick edits, while others offer more advanced features for professional-level adjustments.
Adobe Lightroom (Best for Overall Editing)
- Great for color grading, exposure adjustments, and batch editing.
- Comes with presets that speed up the editing process.
- Non-destructive editing, so you can always go back to your original RAW file.
- Check here for updated pricing and availability
Adobe Photoshop (Best for Advanced Retouching)
- Ideal for removing unwanted objects, blending images, and advanced color work.
- Perfect for HDR merging, focus stacking, and selective masking.
- Great for sky replacements when the weather didn’t cooperate.
- Check here for updated pricing and availability
DaVinci Resolve (Best for Color Grading)
- Primarily a video editing tool, but the color grading panel is top-tier.
- Good option if you shoot both drone photos and videos and want consistent color across both.
- Check here for updated pricing and availability
Luminar AI (Best for Quick, AI-Driven Edits)
- Uses AI tools for fast sky enhancements, color correction, and detail sharpening.
- Good for beginners who want pro-level results without spending hours editing.
- Check here for updated pricing and availability
GIMP (Best Free Alternative)
- Offers many of the same tools as Photoshop, but it’s completely free.
- Not as intuitive, but a solid option for those who don’t want to pay for Adobe products.
Each of these programs has strengths depending on what kind of editing you plan to do. For most drone photographers, Lightroom and Photoshop are the go-to choices, but the others have their place depending on your workflow.
5. Pro Tips for a Smooth Drone Photo Editing Workflow
Editing drone photos can take time, but with the right approach, you can speed up the process while keeping your images looking consistent and professional.

Develop a Consistent Editing Style
- Find a color palette and tone that fits your vision.
- Look at professional drone photographers for inspiration.
- Keep your edits consistent so your portfolio looks cohesive.
Use Presets to Speed Up Editing
- Presets apply pre-made adjustments with a single click.
- Lightroom and Luminar AI let you create and save your own presets.
- You can also buy professional drone editing presets to get a polished look instantly.
Batch Edit for Faster Processing
- If you shot multiple photos in similar lighting, apply the same edits to all of them.
- In Lightroom, use Sync Settings to copy adjustments across multiple images.
- Saves time while ensuring a uniform look across your shots.
Exporting and File Formats
- JPEG: Best for web, social media, and general sharing.
- PNG: Good for images that need higher quality and transparency.
- TIFF: Ideal for printing and preserving details in high-resolution files.
For most uses, JPEG at 80–90% quality is the best balance between file size and image clarity.
6. Conclusion: Mastering Drone Photo Editing Takes Practice
Editing drone photos isn’t just about making small adjustments—it’s about bringing out the best in every shot. Even the most perfectly captured drone photos can benefit from a few tweaks to exposure, color balance, and sharpness. The key is to practice, experiment, and develop your own editing style.
- Start with basic adjustments like exposure, contrast, and white balance.
- Move on to advanced techniques like HDR merging, selective masking, and noise reduction.
- Use the right software to streamline your workflow.
- Save time with presets and batch editing to keep your portfolio consistent.
Every great drone photographer started somewhere. The more you edit, the more you’ll start to see what works and what doesn’t. Over time, you’ll develop an editing style that makes your drone photos stand out.
7. FAQs: Common Questions About Drone Photo Editing
What’s the best software for drone photo editing?
It depends on what you need. Adobe Lightroom is great for basic edits, while Photoshop is better for advanced retouching. DaVinci Resolve is a solid choice for video color grading, and Luminar AI offers quick, AI-powered edits.
How do I edit drone photos for social media?
- Crop your images for the right aspect ratio (4:5 for Instagram, 16:9 for YouTube thumbnails).
- Increase vibrance and clarity for eye-catching details.
- Use export settings optimized for web, like JPEG at 80-90% quality.
Can I edit drone photos on my phone?
Yes, apps like Lightroom Mobile and Snapseed let you make professional-quality edits on your phone. But for serious editing, desktop software like Lightroom or Photoshop gives you more control.
How do I fix overexposed drone images?
- Lower the highlights to recover details in the sky.
- Reduce the whites and adjust the exposure.
- If needed, use the graduated filter tool to bring back details in bright areas.
Final Thoughts
Drone photo editing is all about enhancing what’s already there. Whether you’re adjusting a single shot or editing an entire collection, the right tools and techniques can turn an average aerial image into something incredible.
The best way to get better? Edit often, experiment, and find your own style.


